CS 3451, Spring 2013
Homework 3: Ray Tracing
Due: 11:55pm, Monday, March 25, 2013
Objective
The goal of this project is to write a ray tracing renderer. Your
program should be able to read scene data from a file according to a
defined scene description language. From this, your program will then
render an image of the scene and write out the image to a file. In this
project we will use just two geometric primitives: spheres and triangles.
We will implement shadows and reflection, but not refraction.
Scene Description Language
- fov angle
- Specifies the field of view (in degrees) for a perspective projection. The
viewer's eye position is assumed to be at the origin and to be looking down
the negative z-axis (giving us a right-handed coordinate system). The
y-axis points up.
- background r g b
- Background color. If a ray misses all the objects in the scene, the
pixel should be given this color.
- light x y z r g b
- Point light source at position (x,y,z) and its color (r, g, b).
Your code should allow up to 10 light sources. Any objects in
your scene should cast shadows from these light sources, of course.
- surface Cdr Cdg Cdb Car Cag Cab Csr Csg Csb P Krefl
- This command describes the reflectance properties of a surface, and this
reflectance should be given to the objects that follow the command in
the scene description, such as spheres and triangles. The first three
values are the diffuse coefficients (red, green, blue), followed by ambient
and specular coefficients. Next
comes the specular power P (the Phong exponent), which says how shiny the
highlight of the surface should be. The final value is the reflection
coefficient (0 = no reflection, 1 = perfect mirror).
Usually,
0 <= Cd,Ca,Cs,Krefl <= 1.
- sphere radius x y z
- A sphere with its center at
(x, y, z).
- begin
- Begins the definition of a polygon. Should be followed by "vertex"
commands, and the polygon definition is terminated by an "end".
- vertex x y z
- One vertex of a polygon. For this project, all of the provided
polygons will be triangles. This means you can assume that there will
be exactly three "vertex" commands between a "begin" and "end".
- end
- Ends the definition of a polygon.
- write filename[.png]
- Ray-traces the scene and saves the image to a PNG image file.
Note on color specification:
Each of the red, green, and blue components range from 0.0 to 1.0.
Code Provided
All the provided source code that you will need for this assignment can be
downloaded here: ray_parser.zip.
We have supplied some utility functions that you should use to complete this
assignment. A interpreter routine is provided so that you do not have to write a
parser for the scene description language. See below for more details on
these routines.
- interpreter
- This routine takes the current active CLI file(which you can switch between 10 of them through numeric keys)
and parses it into tokens. Those tokens are organized into arrays. For example, the input "background r g b" will
be put into token[0], token[1], token[2], and token[3]. You can access token[2] if you want to get the green value.
Based on each token in token[0], your program should do different kinds of stuff
discribed in the previous section. By default, three tokens has been handled: "rect",
"color", and "write." "rect" token does basic rectangle drawing. "color" changes the color to be
filled for the later drawing calls. "write" dumps the current frame into an image.
Note: You need Processing 1.25 or higher to compile this routine.
- get_float(String str)
- This routine convert a java String object into float. You can use it to convert token strings into floating point
numbers.
Scene Files
In the directory "data" are several test
scenes that are described by .cli files. Also in that directory are
the images that should be created by these scene files. The file "t0.cli"
is perhaps the most simple image, and you might use this scene as a
starting point. Pressing keyboard keys 1-9 and 0 calls the 10 test samples respectively.
Note: Don't change the directory name or processing won't reconize those files.
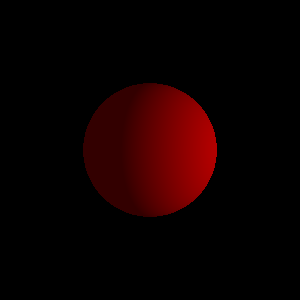
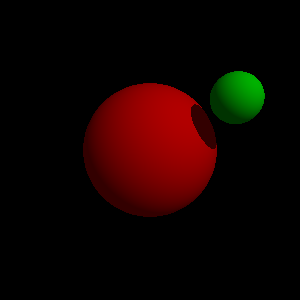
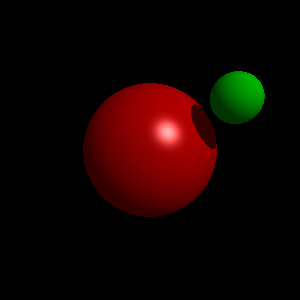
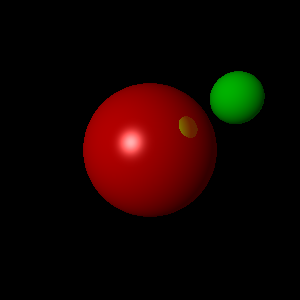
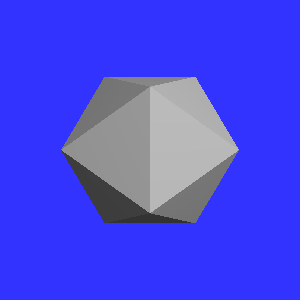
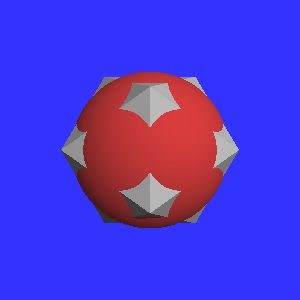
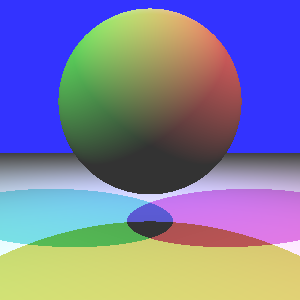
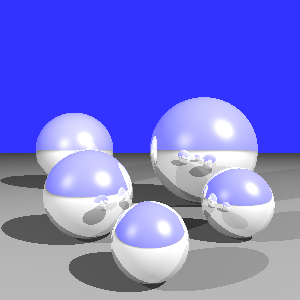
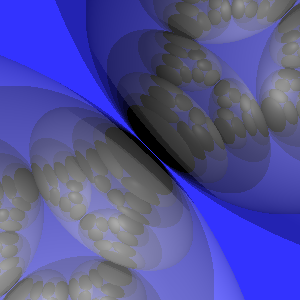
Sample Results:

Suggested Approach
It is probably best to begin by making small changes to the "ray_parser.pde"
program to see how to add new commands to the CLI interpreter. After
you feel comfortable with this, then you can make dummy routines for
each of the commands that your ray tracer should understand. Then
replace each of the dummy routines with real code and you will be done! :-)
Once the shell of the program is ready, we suggest creating the main loop
that creates the primary rays (those from the eye). Start by printing out
the information about these rays to make sure that the numbers make sense.
Once you've got this loop working, then start on the ray/sphere intersection
routine. Don't bother shading the sphere correctly at first-- just color it
anything other than the background color. Once you've got a round object on
the screen, then work on the shading of the sphere. Finally, work on
ray/triangle intersection.
Authorship Rules
The code that you turn in must be entirely your own. You are allowed
to talk to other members of the class and to the instructor and the TAs
about high-level questions about the assignment. You may not, however,
use code that anyone other than yourself has written.
Code that is explicitly not allowed includes code
taken from the Web, from books, or from any source other than
yourself. The only exception to this rule is that you should use the
parser routines that we provide. You should not show your code to other
students. If you need help with the assignment, seek the help of the
instructor or the TAs.
Development Environment
You must use the Processing
language which is built on Java.
The best resource for Processing language questions is the
online or
offline Processing language API (found in the "reference" subdirectory
of the Processing release).
What To Turn In
Compress the whole folder (not merely the files within
the folder) into a zip archive submit them to T-square. The zip archive
should be included as an attachment.
The filename should be "last_first_p3.zip",
so Greg Turk would create "turk_greg_p3.zip" for his homework 3. When
unzipped, it will produce the folder "ray_parser" containing the file
"ray_parser.pde", a directory "data", and other .pde files you created.